

I’ve got the home improvement bug. See, we’re moving — nothing major, just across town — but our new place finally boasts some shared garden space in the backyard. After years of yearning for an outlet for my green thumb, I’ll finally be able to dig into the soil and call forth a cornucopia of vegetables. In fact, I thought, why don’t I celebrate my first real garden with a nice building project?
I’m not much of a carpenter, true. But isn’t that what community is for? Seattle has several tool libraries where you can borrow drills and saws and all kinds of stuff more immediately recognizable to me as horror-movie torture devices than whatever they’re actually meant to be. And this town is bursting with eco-friendly gardeners. Surely someone can give me some tips. I can totally build something cool — I just need to pick a project.
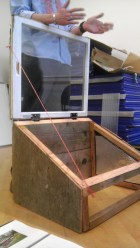
Luckily, I discovered just the ticket: a volunteer-led, community-based skills workshop right here in town. Among tutorials as diverse as soapmaking, backyard goat care, and mushroom cultivation, I found the perfect class: how to build a cold frame from recycled materials. A cold frame, for those of you who don’t know, is kind of like a mini greenhouse — a glass-topped, open-bottom box that shelters tender seedlings or allows you to start cold-tolerant plants, like cabbage or kale, early in the season.
A DIY garden accessory! Recycled! Perfect! So last weekend, I attended the workshop, taught by a local farmer who wore an air of assured experience in organic plant cultivation and a hemp necklace. After witnessing him whip up the cold frame in less than an hour, I’d like to pass along the lessons I learned. (Actual results may vary.)
How to build a cold frame from recycled materials
Step 1: Gather your materials: some scrap lumber you found lying around the farm (or at a salvage shop or Habitat for Humanity worksite, that’s OK too), an old window with hinges, and deck screws …
Step 2: Take your two 2 x 10 boards and attach them by screwing on a post. This forms the back wall of your cold frame. Use self-tapping deck screws, because they’re easier to screw. Oh, and you should have already sawed the top edge of one of the boards and the posts to a 30-degree angle.
Step 2b: Wait — you have to pre-angle the wood? How did you do that? A saw?
Step 2c: Realize that you don’t have a saw. In fact, you haven’t worked with any type of saw since building a mousetrap car in seventh-grade woodshop. You got an A on that mousetrap car, you recall. So you should be able to handle a cold frame. You got this.
Step 3: Next, attach two long, skinny pieces of wood to the back wall; drill two short leg posts to the skinny pieces to form the front of your cold frame. (Oh, didn’t you remember to prep those, too?)
Step 4: Now you screw on the plywood side panels, which of course you’ve already measured and cut to fit exactly. Try not to think about how geometry was your toughest subject, and how you really hate to perpetuate gender stereotypes, but spatial reasoning has always been challenging, to the point where your younger brother used to beat you at Tetris — which was really embarrassing — but it’s fine because we’re all gifted in different ways, right?
Step 5: Attach the old window to the top of the back wall with the hinges. Put sticky weatherstripping all around the top of the frame to cushion the window, which is really heavy. At some point you should have added insulation to the cold frame in the form of Styrofoam wrapped in duct tape, too. Oh, and a piece of wood for the front. Don’t use particleboard.
Step 5b: Don’t panic when the instructor tells you he used a window for simplicity here, but really you should use an old sliding glass door, because who wants a tiny cold frame that only holds a few plants?
Step 6: Stare at the completed demo cold frame with fear and awe.
OK, so maybe this building experiment didn’t go exactly as I’d hoped. But it’s not all disappointment: At the end of the workshop, our instructor let it slip that there are easier ways to construct a cold frame. They’re more crude, but still. Turns out you can do something as simple as arranging straw bales in a rectangle and laying an old glass door over them– no screws, no cutting. You can even toss an old apple box, minus its bottom, on your garden soil and top it with a salvaged window. Now that sounds attainable.
In the end, the workshop was hardly a waste of time. It was a valuable reminder that a woman must walk before she can run, and perhaps a woman should put the cold frame building project on hold until she sharpens her carpentry skills. Further research has already turned up a plan for a much easier rectangular raised bed, so I’m going to tackle that one first.
And even before I get going on the raised bed, I plan to employ some repurposed planters — I love the look of an old drawer overflowing with fresh garden herbs. All you need to do there is drill a few drainage holes in the bottom. And yes, even I can manage a drill. What a glorious start.
Readers: Ever gotten in over your head on a DIY project? Do tell …