When my friend Deanna told me that she wanted to make a gingerbread house this year — and, in particular, to do so on Black Friday, aka Buy Nothing Day — I immediately asked if we could make an environmentally sound house. The chances of my ever being able to afford the real-life eco-house of my dreams are slim unless I win the lottery, but I figured I could at least afford the gingerbread version. Deanna agreed and we were off and running, dreams of sugary solar panels and rammed-earth gingerbread dancing in our heads.

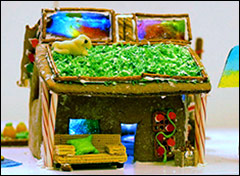
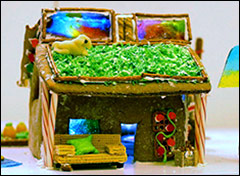
Chez Gingembre Vert.
Photo: Bonnie Borthwick
I wrote to all of my friends who work in the fields of green construction and sustainable living, asking them for suggestions. Solar contractors, energy experts, and landscape designers all had ideas of varying degrees of usefulness. Projects involving actual compost and plans for a tableau featuring a white chocolate composting toilet were rejected outright, but suggestions for a green roof, rainwater collection barrels, and raised garden beds were gratefully accepted. Deanna had her heart set on making a windmill, and I wanted solar panels and a clothesline. (I also like to think that there are red wigglers under the imaginary kitchen sink, but that’s a project for another day.)
As my mind zoomed into planning overdrive, it was hard to remember to keep things simple. Voluntary simplicity is hard to practice when you are working in the medium of gingerbread! Everything seems possible given enough flour, sugar, imagination, and time.
It took Deanna, her husband Craig, and me most of five days to create the house depicted here, along with two other more traditional styles. Near the end it felt like somewhat of a gingerbread forced march. Nonetheless, we learned a lot about green construction as we researched each element of our homestead, and we also learned a lot about working with gingerbread, food coloring, and candies. By the time we were done, I felt like I was channeling the spirits of two of my heroes: Rachel Carson and Duff Goldman.
Can We Build It? Yes We Can
Since we planned to make three houses, we experimented with a few approaches. I bought a kit made by Dancing Deer Bakery that came with a gingerbread and icing mix, requiring the addition of only eggs, butter, and water, and a kit that featured 3-D cutters (i.e., cookies shaped like people and trees that have slotted “bases” that allow them to stand up) that came with recipes for gingerbread and icing from Williams-Sonoma. We also used recipes that I downloaded and tinkered with a bit (we substituted organic brown rice syrup for half of the molasses for a lighter color and better taste). I ordered a kit of house-sized cookie cutters and we also made some of our own templates. You can make your own templates out of posterboard and tape them together to see if they work before executing your vision in gingerbread.
On the Wednesday before Thanksgiving, we bought the ingredients, mixed the dough, and bundled it up so that it could rest in the fridge until we could turn our attention back to it the day after Thanksgiving. We had originally hoped to bake that first day as well and let the “sheetrock” dry out and cure over Thanksgiving, but we couldn’t fit it in.
On Friday (Day Two), we took all three batches out and started rolling out the dough and baking the panels. Rolling the dough to the right depth and evenness went well, but it became apparent that we should have refrigerated the pieces after cutting them, as the directions suggested. I believe this would have helped to prevent the spreading that occurred when they were baked (which, among other things, made the slots and tabs in the 3-D kit no longer match up very easily) — but like most people, we didn’t have room in the fridge to pull off that step. (It was, after all, the day after Thanksgiving.) If we had been thinking more clearly we probably would have set the baking pans outside to cool in the brisk air on the screened-in porch, but we were still logy from all the tryptophan from the previous day’s turkey.
Another problem we ran into with our first batch was warping from the spatula when we picked up the dough to transfer it to the cookie sheet. We discovered a protocol that prevents this problem: roll the dough out on parchment paper. After cutting the dough and removing the extra pieces, you can drag the whole thing, parchment paper and all, onto the baking pan.
Why bother? Well, just as with a real house, the more out of plumb, or “unsquared,” your pieces (aka the “sheetrock” or, as Deanna’s father used to refer to it, “lumber”), the harder it will be to make them flush. That, in turn, makes it hard to get them to stick together using the icing “cement.” We also needed to address the issue of the mismatched slots and tabs. Fortunately, Deanna has a steady hand and a sharp knife, and took to quite literally cutting the pieces down to size, even the teeny crotches of the little ginger men, where the bases needed to slip in. “Sorry, dude!” she’d mutter, and then she’d set to work.
Putting It Together
After baking (and performing surgery on) our house panels, we began the delicate process of gluing the panels together. To do this we made royal icing. Again, we used a few different recipes. The Dancing Deer kit came with its own mix that required only water, and the Williams-Sonoma recipe called for powdered sugar, egg whites, cream of tartar, and water. Deanna has her own recipe (see below) that’s made from cream and powdered sugar, which is good for when you want to be able to eat your creation.
Deanna’s daughters kept asking why they couldn’t eat the icing that contained raw egg whites, and it was because of this that Deanna and I discovered that it is possible to sing the melody of the Hallelujah Chorus substituting the word “Salmonella” for Hallelujah. (Also, a note: if you have a household in which adults attempt to refrain from swearing in front of impressionable young children, you might want to undertake some of the trickier assembly portions while the kids are asleep or on a play date. Need I elaborate?)
We used foam core as the foundation for our houses. Deanna cut a trap door in one of them so that we could insert a little “Stick’n’Click” LED light to highlight the stained glass windows she made out of Lifesavers and Jolly Ranchers. We placed large pretzels against the inside seams of the houses to give them a little bit more support and to provide another surface for the icing to stick to as it holds the two walls together at the joint. We also temporarily braced the walls with canned soups both inside and outside so they would set properly while the “glue” dried. Some people make a “floor” out of gingerbread or thick cardboard, but we didn’t think that was necessary.
We experimented with many melted-candy window materials. I don’t know if Lifesavers make windows with adequate R ratings, but they make fine stained glass. We found that the fewer pieces we melted (i.e., a whole Lifesaver vs. one that had been cracked into a few pieces) the fewer bubbles were produced. Deanna used a silicon mold and melted them in the microwave in short bursts, then tilted the mold while the candy was runny until she got the shape she wanted. She also cut the edges with a cookie cutter while the “glass” was still somewhat warm and pliable. To make the windmill fins, she used cookie cutters, breaking off the excess until she had the shapes she wanted. Be careful with this step, especially if kids are around, because the sugar is hot!
Deanna glued the “stained glass” to the inside of the house using icing. This turned out to be more reliable than baking the candy directly into the gingerbread, because you could bake each element without over or under-baking the other. By now (Day Three … the kids started asking why I didn’t just move in, or at least spend the night …) we were ready to make the ginger hippies who would live in the eco-house.
Of Hippies, Windmills, and Other Creations
I bought some food coloring and worked on decorating the ginger men, women, and children. I learned a hard lesson about how to tint the icing, ending up with an entire bowl of deeply tinted icing — and a lot of redheaded hippies — because I had squeezed a few drops of coloring directly into the icing. I finally figured out that the best method is to put a very small amount of icing in a small bowl, add a tiny bit of dye, and mix it until you have some intensely tinted icing, which you can then add to a larger bowl of white icing until you have the exact shade you are looking for.

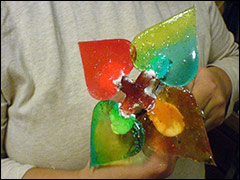
C’mon, give it a whirl.
Photo: Craig Dement-Myers
I dipped a toothpick into food coloring and used it like a paintbrush to paint on some of the faces. I used sprinkles to make eyes, noses, and lips on some of the other cookies. Deanna created the outfit for a guy wearing overalls, and added a silver dragée for a nipple ring. (Somehow I don’t imagine that the manufacturers of dragées ever foresaw this use.)
Then Deanna and I spent an afternoon cruising the candy, cracker, and cereal aisles of the local supermarket with an eye toward miniature props. We bought things we’d normally never even let into the house — and bought them in profusion! Root beer barrels were melted down to make solar panels, Juicy Fruit gum was cut into clothes for the clothesline (no clothes dryer in this house!), wafer cookies became a busted couch missing one leg for the front porch (reduce, reuse, recycle!), and candy canes were turned into marble columns in honor of a friend who really likes the ads for marble columns on Saturday Night Live. Deanna’s rationale for this was that some wasteful person who was building a McMansion nearby had ordered the columns but they were the wrong shade of red, so the hippies rescued the discarded columns and put them to good use.
On Day Five we added the finishing touches to our creations, and Deanna and Craig assembled the amazing multicolored windmill. I placed the marzipan Nubian goat (for farmstead goat cheese) on top of the green roof (shredded coconut tinted with food coloring) and I used kumquats as pumpkins in the raised-bed, French-intensive garden. Deanna made a pretzel zafu meditation cushion to go next to the Koi pond. The clothesline was tricky, and we finally gave up on our food-only guideline and used a non-food glue to get the chewing gum clothes to stick to the licorice-whip clothesline. We used cloves as clothespins (or, as we now refer to them, clovespins.) Deanna coped the gutter and cooped the barrel.
At last we were done. With our creations and our friendship still intact, we celebrated our little gingerbread eco-house. We learned a lot about the tricks and tactics necessary to pull this off successfully, and we also learned that, like any construction project in the real, non-gingerbread world, no project ever really comes in on time and under budget, even when you act as your own general contractor.
More importantly, I realized that even if I can never afford the eco-friendly house that exists in my mind’s eye, I can at least incorporate several elements into my existing home (clothesline, rain barrel, compost pile, red wigglers, etc.).
We’re already gearing up for next year: now that we know the secret to making panes of glass, why not make a solar greenhouse? And if we’ve got time to spare, wouldn’t it be cool to make a model of Diagon Alley? Only 12 months left until we get going again!
Deanna Dement-Myers’ Royal Icing
Heavy cream
Powdered sugar
Vanilla extract
Food coloring (optional)
The cream-to-powdered-sugar ratio is between 1/4-1/3 cup cream to 2 cups of sugar. Add a tablespoon of vanilla for extra yum. Remember, a few drops of liquid food coloring will thin out the frosting if it seems too thick after mixing it.


