Clare Barboza
The following recipe appears in The Meat Lover’s Meatless Celebrations by Kim O’Donnel.
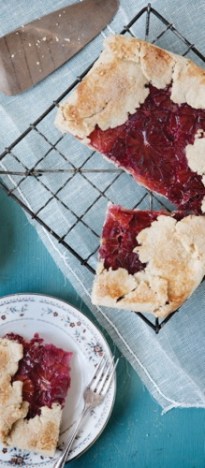
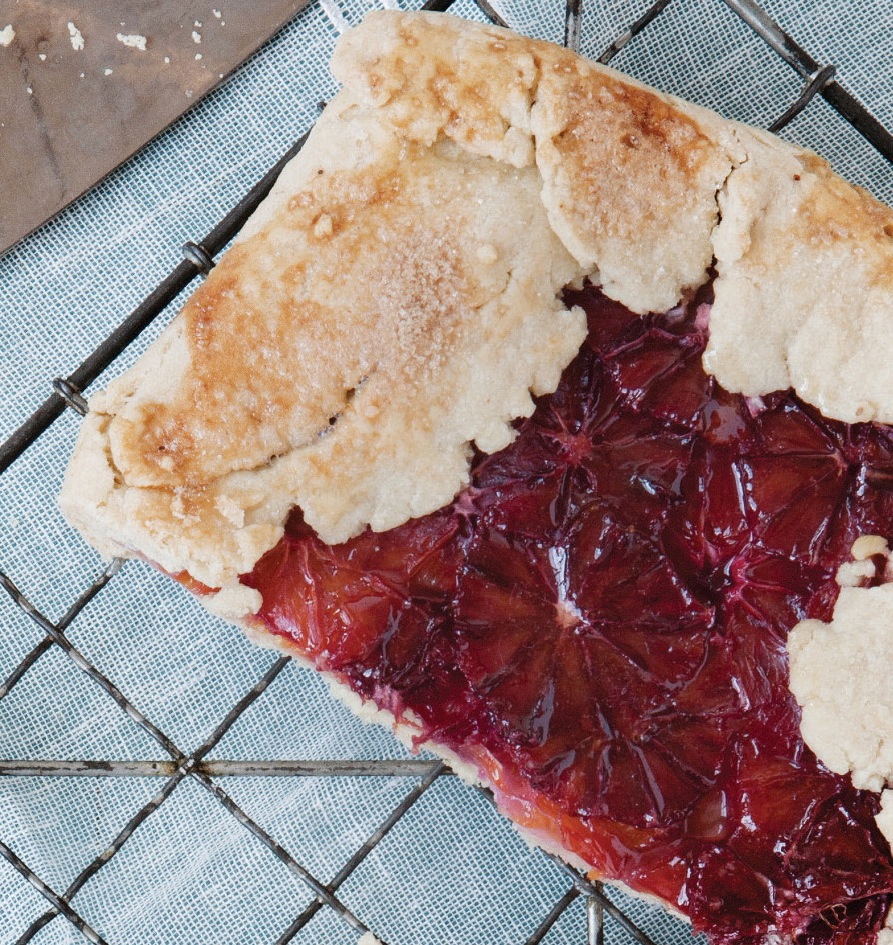
If you’ve never made a galette, it’s more rustic than either a pie or tart. I often like to describe it as a big Pop-Tart.
Kitchen notes: It’s always a good idea to read a recipe in entirety before cooking, but in this case, it’s particularly crucial. Playing with dough requires a bit of organization. Make the filling first.
You want it to be ready because the dough, once rolled out, waits for no one.
Blood oranges, which are typically in season from December through March, vary in size. You’re looking for a total of two cups of fruit for the filling. Don’t worry if your total amount of fruit falls short; you can get away with 1.75 cups of filling.
Because a galette is baked free-form without a pan, it’s important to shape and roll out dough on a silicone baking mat or parchment paper that will ultimately be transferred to a baking sheet.
Makes six to eight servings.
Blood orange filling
4 to 6 medium-size blood oranges
1 teaspoon ground cinnamon
1 tablespoon all-purpose flour or cornstarch
1⁄2 cup granulated sugar, plus more to taste
Pinch of salt
Enlightened pie dough
4 tablespoons olive oil
1⁄2 cup water
2 cups all-purpose flour, at room temperature, plus more for dusting
1⁄4 teaspoon salt
1⁄4 teaspoon baking powder
4 tablespoons butter, cut into tablespoon-size pieces
2 to 3 tablespoons apricot or raspberry jam
Egg white wash: 1 egg white, beaten with 1 tablespoon water
1 to 2 tablespoons granulated or coarse sugar
Tools: Food processor, 5-inch dough scraper, silicone baking mat or parchment paper, silicone or pastry brush
Preparation
Blood orange filling
With a paring knife, remove the peel and pith of the blood oranges. Begin by slicing off the peel of both ends so that the fruit can sit upright. From top to bottom, slice away the peel and as much pith as possible without cutting into the fruit. Trim the pith as needed. Cut the oranges into quarter-inch rounds.
With the tip of the knife, carefully remove any seeds and poke out any remaining white pith knobs in the center of the rounds.
Place the fruit in a medium-size bowl and add the cinnamon, flour, sugar, and salt, stirring gently until completely coated. Allow to macerate for about 30 minutes.
Enlightened pie dough
Place the olive oil in a small bowl and set aside.
Place the water in a small saucepan and heat until very hot. It need not be boiling but should be pretty close.
While the water is heating, measure out the flour. Remove 1 tablespoon and reserve for rolling out the dough. (You may need a little bit more than your reserve for a second rolling.) Place in a food processor, along with the salt and the baking powder, and pulse a few times just to mix.
Add the butter. Pulse until the mixture looks and feels like fluffy sand. You should not be able to see butter clumps.
Measure out 1⁄4 cup (4 tablespoons) of the water and add to the oil. With a fork, whisk together; it will look like a vinaigrette.
Pour the oil mixture on top of the flour mixture, and pulse until the dough just comes together. It may slightly pull away from the sides of the bowl. The dough should feel soft, warm, and pliable, not hard and crumbly. If the dough looks as if it needs more liquid, add the hot water in 1-tablespoon increments, pulse, and check the softness of the dough.
Lightly dust your rolling surface with some of the reserved flour, and place the dough on top. Surround the dough with both hands to let it know you’re there, or as Kate McDermott says, “give it a good handshake,” molding it into a cohesive lump.
Roll the dough in quick, even strokes, making a quarter-turn after every few strokes. As you rotate and roll the dough, check regularly to make sure the dough is not sticking. (A dough scraper is helpful at this stage.) The immediate goal is to make a rectangle roughly nine by 11 inches. (Don’t worry if it’s not exact.)
Fold the dough like a letter: Starting from a short edge, fold over a third of your dough. Take the opposite edge and fold it to the middle, covering the first fold.
Make a quarter-turn, then roll out the dough into a new rectangle, dusting with flour as needed. Make another letter fold with the dough.
Give the dough another quarter-turn, and roll the dough in all four directions — north, south, east, west. Fold the dough in half into a four- to five-inch square packet. Roll lightly on top to seal the layers and surround the edges with both hands to tidy the dough.
Wrap the dough in plastic and allow to rest in the refrigerator for a brief 10 minutes. Unlike an all-butter dough, this dough never goes into a deep sleep and gets cold; think of it as a brief catnap after all that rolling and folding.
Preheat the oven to 425 degrees F.
In a microwave oven or a small saucepan, heat up the jam until melty, like a sauce.
Roll out the dough on the rolling surface. Dust both the top and bottom of the dough with extra flour, as needed. With more of those deft, even strokes, roll the dough into a nine- or 10-inch circle or rectangle.
Brush the surface of the dough with a thin layer of the melted jam, leaving a two-inch border all around.
Strain the fruit before placing on top of the dough. Arrange the fruit in overlapping fashion, again within the two-inch border.
With the help of a dough scraper (or the surface underneath), lift the margins of the dough, section by section, over the filling, pressing dough edges when they meet. As much as one-third of the filling in the center will be exposed; that’s OK.
Brush the top of the dough with the egg white wash, then sprinkle lightly with the sugar. Brush the exposed fruit with the remaining melted jam.
Transfer the galette (and its liner underneath) to a baking sheet and into the refrigerator for a quick five-minute chill.
Bake for five minutes. Lower the heat to 375 degrees F and bake for an additional 35 to 40 minutes, checking at minute 30 for doneness. The galette is done when the crust is golden and the fruit is bubbling.
Grab the two ends of the parchment or baking mat and transfer the galette to a rack, allowing to cool for about one hour.
From the book The Meat Lover’s Meatless Celebrations by Kim O’Donnel. Excerpted by arrangement with Da Capo Lifelong, a member of the Perseus Books Group. Copyright (c) 2012.


