November is the new September. — Aladdin Ossorio
I’ve been itching to make a Baked Alaska. In 1989, the year the Exxon Valdez spilled oil all over Prince William Sound, my friends and I had several Baked Alaska parties featuring a whiskey-laced “Exxon Valdez Fudge Sauce” that I concocted to recreate the oil slick — and to commemorate the fact that Captain Hazelwood reputedly imbibed a great deal before the tanker ran aground.
Do try this at home.
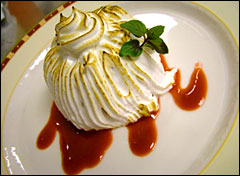
Photo: iStockphoto
So what, exactly, is Baked Alaska? I’m glad you asked. When I mentioned it to someone I recently met, he said, “What’s that? Alaskan salmon and snow crab?” Not exactly. (Although that does sound great.) While I was explaining that it is cake layered with ice cream which is then covered in a coating of meringue that acts as a form of insulation that keeps the ice cream frozen while the meringue toasts in the oven, it occurred to me that I sounded completely mad. My new friend smiled politely.
Some other friends of mine have two daughters who have recently turned 7 and 10, so I thought it would be fun to make them a Baked Alaska for their birthday dinner. My friends found out that another friend would be in town with his kids, and soon we had a full-fledged party on our hands — which was lucky, because Baked Alaska does not excel as a leftover. Not content to leave well enough alone, I invited yet another friend, who bravely said yes.
Late October seemed like a good time to make Baked Alaska: cool, dry air is perfect for making meringue. I knew I wanted to make a somewhat traditional version for the kids — chocolate cake layered with Oreo ice cream — but I wanted to make an “alternative” version for the adults, especially because a few people wrote in asking for non-pie holiday desserts last year, and I wanted to create something that would be a new twist on an old idea. I decided to use gingerbread cake layered with pumpkin ice cream.
I started the preparations the day before. Baking the cakes went well enough, and I spread the softened ice cream out in cake pans the same size as the cake. It’s ideal to ready the ice cream a day ahead so it can harden into the same shape as the cake.
The night of the party, I could hear from the kitchen that some serious tickling was going on in the living room, and kids were yelling stuff like, “Daddy! Do Yoda!” Somehow we all got roped into doing imitations. Fortunately I’ve been working on my Julia Child since I was 3 years old, and the friend I asked to dinner unexpectedly had a fine Bob Dole up his sleeve. Kermit the Frog, The Governator, Arianna (the self-appointed Spartan cheerleader from SNL), and a few other dignitaries all graced our evening as well.
When it was time for dessert, I headed back to the kitchen. In a perfect world, I would have taken the step of removing the ice cream from the pan it was molded in, combining it with the cake, then freezing the entire entity for at least a few hours before covering it in meringue. Freezer space was limited, however, so I wasn’t able to do that, but sticking the ice cream between the cake layers seemed to work OK — except that they were melting due to the heat. Did I mention that it was incredibly hot out, and not just for October? It was also one of the most humid days I can ever remember. Humidity isn’t great for making meringues.
Finally the meringue was in good enough shape to slap it onto the cake and ice cream, and it was time to bake the whole thing. I had bought a little butane torch for the occasion, because I thought the kids would get a kick out of seeing the meringue toasted with it — plus I’ve always coveted one. But alas, I didn’t have any butane, because I’d assumed that it came with the torch. One of my friends, after explaining that flammable liquids aren’t usually shipped in boxes filled with other stuff, offered to head out into the warm, cruel night to find some, which was very sweet (chivalry is not dead!). But we decided to just go the traditional route and stick with the oven.
I popped the chocolate Alaska into the oven, where it promptly burned, but still tasted great. As we sat around in the heat and humidity watching the Baked Alaska turn to mush in a sort of imploded, sugar-based diorama describing the effect of global warming on the actual Alaska, I felt the urge to turn to my friend and thank him for coming to meet my crazy family. Just as the words were about to pass my lips, I remembered that this group of people that I love so much are not, in fact, my family — mostly just good friends that I’ve known for a long time. They feel like family, though, and that’s good enough for me. Ahoy!
Baked Alaska
The truth about Baked Alaska is that it is actually really simple to make. Can you bake a cake? Can you whip egg whites? Can you mush soft ice cream and bend it to your will? If you answered yes to these questions, then you, my friend, can easily make and assemble a Baked Alaska. It takes several steps, a roomy freezer, and some advance planning, but it’s not difficult — it only looks that way. You need organizational and time management skills more than baking skills to pull this off.
My only word of caution is not to make it on a blisteringly warm October day. It’s kind of frightening that that’s even an issue. What’s next? Chestnuts roasting on a wildfire? Sigh.
The Cake Part
When I made the cakes for the Baked Alaska party, I used a simple chocolate cake recipe that I had on hand for the kids’ cake; for the grown-ups, I made a gingerbread cake that I paired with pumpkin ice cream. I attempted to create a “blonde” gingerbread by swapping out the molasses for maple syrup because I’m not crazy about molasses. It turns out, however, that gingerbread just isn’t gingerbread without the dark, bracing bite of molasses, so the next time I made Baked Alaska (last Monday), I decided to go a completely different way.
I made pumpkin cake instead, which can be layered with vanilla ice cream (or sweet-cream ice cream, or maple-walnut ice cream, or dulce de leche ice cream …). I wanted the flavor of mulled cider in there too, so I added cinnamon, ginger, allspice, and cider. You can make this either as a layer cake (in which case you will need to double the recipe) or simply as a square cake that you can serve with or without frosting. A little bit of powdered sugar would be nice on top of the naked version of the cake. (Get organic powdered sugar, if you can, as powdered sugar has cornstarch in it.)
Mulled Cider Pumpkin Cake
Serves 8
This makes one layer of a layer cake, or one square pan, so if you’re making a Baked Alaska do this twice. (This cake is vegan, but don’t tell anybody.)
Dry ingredients
1 2/3 cups flour
1 cup packed brown sugar
1/4 teaspoon allspice
1/2 teaspoon ginger
1/2 teaspoon cinnamon
1 teaspoon baking soda
1/2 teaspoon salt
Wet ingredients
1/2 cup cider
1/3 cup vegetable oil
3/4 cup canned pumpkin puree
Then add
1 teaspoon cider vinegar or regular white vinegar
Preheat the oven to 350 degrees F.
Mix the flour, brown sugar, spices, baking soda, and salt in a large mixing bowl.
Mix the cider, vegetable oil, and pumpkin puree in a bowl.
Add the wet mixture to the dry mixture and stir until thoroughly blended. Next add the cider vinegar (or regular vinegar) to the batter. You will see a mild reaction between the vinegar and the baking soda. (The batter gets lighter in color and fizzes ever so slightly.) Stir thoroughly so that this leavening agent will be spread equally throughout the cake.
Pour the batter into an ungreased, 8-inch square cake pan or an 8-inch round pan for a layer cake. Bake for 30–40 minutes. Start checking after 25 minutes. The cake is done when a knife inserted comes out dry. Turn the cake out onto a cooling rack or plate lined with parchment once it’s slightly cool.
The Ice Cream Part
2 pints ice cream
1 cake pan the same size and shape as your cake
baking parchment
1 big, heavy-duty freezer plastic bag
The day before you plan to serve the ice cream, buy two pints of the flavor of ice cream that you want to use. Let it soften until it is malleable. Cut two pieces of parchment to the size of the bottom of the pan that you’re using. (You can buy parchment circles that are precut to a round baking pan.) Put one piece of parchment at the bottom of the pan. Mush the ice cream into the pan with a spatula. Try to make it even, but don’t go crazy — there’s no need to wrap a carpenter’s level in plastic wrap and lay it across the surface of the ice cream or anything. Next put the other piece of parchment on top to create a sort of cover. Now put this whole thing in a heavy-duty plastic bag and stuff it into the freezer until the next day.
Cake and Ice Cream Entity Assembly
In a perfect world (which is to say a world with a capacious freezer) you would assemble the cake and ice cream interface several hours before the baking begins so that the different elements have a chance to freeze into one entity, but if you don’t have freezer space or the timing isn’t right you can assemble this whole thing right before you slap the meringue onto it. It still works.
Release the ice cream from the pan that you used to mold it. I find that inverting the pan while it’s still in the plastic bag and putting warm, wet washcloths on the top and around the sides seems to do the trick, but you can also run it under warm water from the sink (while it’s still in the bag, to keep it from getting wet).
If you’re making a layer cake, put a cake layer down onto a layer of tin foil that’s been placed on a metal baking sheet or pizza pan (i.e., something that can go into the oven), then the ice cream layer, then the other cake layer. Now you are ready to either freeze it (wrapped in freezer wrap) or to apply the meringue immediately.
The Meringue
If it’s a humid day just lower your expectations. (Actually this is good advice in general. You’ll enjoy life more.)
I’ve always put the meringue on the cake right before baking it, but when I was researching this topic I found several versions that call for adding the meringue to the cake and then freezing the entire thing for several hours. I’m eager to try that someday when I have a bigger freezer. Meanwhile, though, I can vouch for the fact that it will still work if you don’t do the freeze-the-meringue bit.
In the past I’ve made meringue without cream of tartar. This time, though, I added it and it did seem to make the meringue a little bit more stable. So, if stability matters to you, by all means add the cream of tartar. If you are more of a footloose and fancy-free kind of baker, then skip it.
I also read in some recipes not to add the sugar to the egg whites until they have already been beaten to a soft peak. I’ve always added the sugar at the beginning, and it’s always worked, but the next time I make meringue I am going to try adding the sugar after beating the egg whites to see if it makes any difference. I would love to hear from readers who try it both ways to see if there is a discernible difference.
Preheat your oven to 425 degrees F.
8 egg whites
1/8 teaspoon salt
1/8 teaspoon cream of tartar (optional)
1 cup white sugar
Separate the eggs, making sure that you don’t get any yolks into the whites. (Save the yolks for making custard. Yum!) Let the whites come to room temperature. Pour the egg whites into a big bowl that has enough room to let the meringue expand as air is incorporated into the egg whites.
Add the sugar, cream of tartar, and salt to the egg whites. (Or, alternatively, wait until the whites have been beaten so that they hold their peaks and then add the sugar.) Beat until the whites and sugar combination holds stiff peaks.
Using a spatula, apply the meringue to all the surfaces of the cake until it is completely covered. The sides are tricky, but just keep at it until the cake is entirely covered in meringue.
Bake the meringue at about 425 degrees F until it is lightly browned. Serve at once.
“Exxon Valdez” Fudge Sauce
8 ounces of semisweet chocolate
3/4 cup heavy cream
1-2 tablespoons of your favorite liquor
Use a double boiler or create a double boiler by placing one pot over another pot of steaming water. You can’t melt chocolate properly over direct heat. (I have made this in the microwave, though! You just have to watch it like a hawk and do it in short bursts.)
Pour the cream into the pot and add the chocolate (if it’s one big piece, break it down into smaller pieces.) Melt gently over medium heat. The contents of the pot may pass through a phase where it looks like lots of little pieces of chocolate are suspended in the cream, but once the chocolate is all truly melted take the pot off the burner and stir the sauce until it is smooth and glossy.
Don’t melt the chocolate and then add the cream. This will make the chocolate “seize up,” which means that it suddenly goes all hard and weird when the cream touches it. If that does happen, it’s not the end of the world. Just melt it gently over low heat and it will pull itself together.
Enjoy with friends!