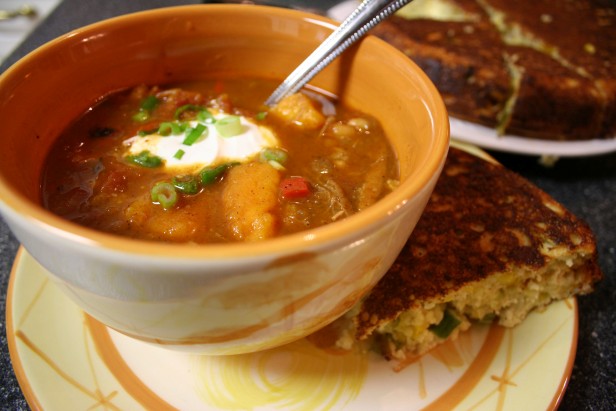
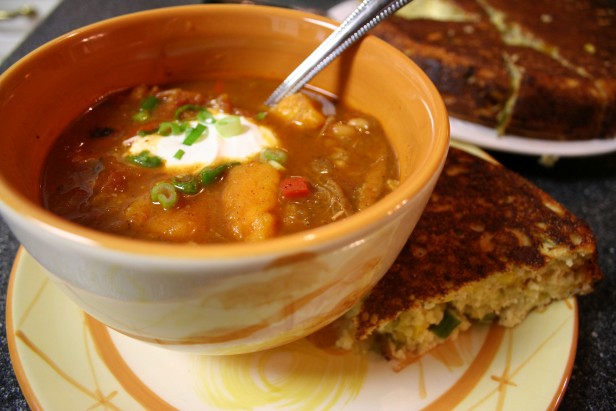
 Try April’s White Bean and Pumpkin Chili recipe (below).Photo: April McGreger
Halloween has pagan roots in the Celtic Samhain, a festival of the harvest and the dead. The Celts saw the end of October as the “end of lightness” or the end of summer, and the “beginning of darkness,” or the long, cruel winter ahead. At this time of year, harvests were complete, livestock were slaughtered, and community bonfires were started. During this transformation from light to dark, the ancient Celts believed that the border between this world and the spirit world became thin, allowing spirits to pass through. Some spirits were thought to be harmless, such as the family’s ancestors; while other harmful spirits were warded off with the use of masks and costumes.
Despite Halloween’s origins in European culture, it has clearly meshed with Native American culture here in the United States, with the elements of corn and pumpkins being the most common symbols of the harvest. The next time you find yourself carving a pumpkin, you should think of how much more difficult your task would be if you were following the Celtic tradition of carving a much denser turnip or rutabaga. The American tradition of pumpkin carving actually preceded the popularization of the Halloween celebration in the United States, which is thought to have origins in the Irish immigration following the Great Famine of 1846. Pumpkin carving was a harvest ritual and was not specifically associated with Halloween until the mid-to-late 1800s.
However, for all of our Halloween obsessions with pumpkins, the culinary state of our much beloved gourd is a sad indeed. Aren’t our pumpkins good for more than scary or comical faces? Most of the pumpkins grown in the United States are purely ornamental. Even if you tried to roast and eat your jack-o-lantern, you would quickly discover that most of the flesh has been bred out of the pumpkin and what is left is watery, stringy, and of lackluster taste. Sadly, the only pumpkin that most Americans have eaten is canned and usually in the form of an overspiced pie or quickbread. One can fully understand why pumpkin remains a virtually undiscovered vegetable at this point.
I did not begin to fully appreciate pumpkin until I began to think outside the box — or, more accurately the orange globe. If you are looking only for round, bright orange ones that we most readily identify as pumpkins you are missing out on a myriad of beautiful colors and shapes and the best pumpkin eating. It is also important to note that terms pumpkin and winter squash are used interchangebly, so we should loosen our rigid “pumpkin” guidelines even further. Both are gourd-like squash of the genus Cucurbita.
Some of my favorite varieties are the beautiful grey-blue Australian Jarrahdale; the Japanese kabocha; the old green-striped Southern cushaw, popular in the Appalachians; and in South Louisiana, the Long Island cheese pumpkin. And the dependable and ubiquitous butternut squash is my favorite supermarket standby. I will use any of these varieties in my “pumpkin” pies–and the pies are much better for it.
However, my pumpkin culinary advententures don’t stop there. By far the tastiest method for cooking winter squash is to roast it in big chunks that have been tossed with a bit of olive oil and salt and pepper. Roasting the pumpkin slightly caramelizes it and gives it an amazing depth of flavor that I find totally addictive. You can then use the roasted pumpkin in many different ways. I love big chunks of it on top of a salad of spicy mixed greens and hazelnuts, walnuts, or pecans. Many other cultures have explored the savory possibilities of winter squash with much greater depth.
In the Mediterranean, they make a lovely autumnal hummus of roasted pumpkin and tahini. The French love their pumpkin gratins; the Italians, their pumpkin risottos and ravioli. In Mexico, they make a delcious raw sugar roasted pumpkin very similar to Southern candied yams. I particularly love pumpkin when its sweetness is countered with a bit of spice, such as the savory tarts that I make with pumpkin and a spicy Indian tomato chutney and the agrodolce (sweet-sour) pumpkin from Mario Batali’s Molto Italiano.
It was with these dishes in mind that I gravitated toward a chili with pumpkin. Since fall is also firmly established soup and chili season in my family, it seemed a natural fit. Moreover, following the wisdom of “what grows together goes together,” I knew that the American Indian crops of pumpkin, beans, peppers, and a side of cornbread were a natural match. The results did not disappoint. So this weekend, whether you are carving pumpkins, trick-or-treating, or standing around a big bonfire, you can have your pumpkins and eat them, too.
Feel free to substitute other beans in this chili, or add meat for a non-vegetarian version. When I made this recipe at my parents’ house this weekend, 2 cups of shredded brisket from a previous meal made a delicious addition. If you wanted to add meat from the beginning, you would need to brown it along with the onions and peppers.
—————————-
White Bean and Pumpkin Chili
2 medium onions, diced (about 2 cups)
2 red bell peppers, preferably roasted and skinned, cut into medium dice
2 jalapeño peppers, seeds and membranes removed, cut into fine dice
4 Tablespoons olive oil
2 1/2 pounds tomatoes, coarsely chopped, or about 4 cups
1 1/2 tablespoons chile powder, mild, hot or a combination
1 teaspoon ground cumin
1 teaspoon curry powder
1/2 teaspoon ground cinnamon
2 bay leave
2 teaspoon salt
2 teaspoons honey or sugar
2 teaspoons apple cider vinegar
4 cups cooked white or black beans, preferably from dried
4 cups roasted pumpkin or winter squash, directions below*
pinch of Mexican oregano
Serve with sour cream, chopped cilantro, chopped scallions, shredded cheese, and cornbread (recipe below).
Directions:
Bring the beans to a boil, then turn down and simmer until tender. Otherwise, use drained and rinsed canned beans** (see below).
In a large stock pot, sauté the onions in olive oil until lightly golden. Add in the bell peppers and jalapenos, and cook for about five minutes until tender. On medium heat, add the chili powder, curry powder, ground cumin, cinnamon, bay leaves, and salt, and cook for another minute. Then add the tomatoes and the honey or sugar, stirring well to incorporate. Cook at a simmer for 10 minutes.
Once the beans have become tender, add them into the chili base, along with their juice, and simmer for about 1 1/2 hours. Add the pumpkin and vinegar just before serving. Taste, and adjust seasoning.
*Remove the seeds and the fiber from the pumpkin and cut the flesh into chunks, leaving the skin still attached. Mix the chunks in a bowl with 2 or 3 tablespoons of olive oil, salt and pepper, and a teaspoon of dried oregano. Lay the chunks on a baking tray, skin side down, and put them in the oven, which you have preheated to 425 degrees F. When the chunks of pumpkin are soft and the edges are tinged with brown, remove from the oven and allow to cool, and scoop out chunks of the pumpkin from the skin with a fork. Measure out 4 cups of the pumpkin and save the rest for another purpose, like a salad or snacking later.
**If using canned beans, cook the chili tomato base an extra 20 minutes before adding the beans. Add the rinsed beans along with 2 cups of water and cook for another 20 minutes. Add the pumpkin and adjust seasoning before serving.
Black Skillet Cornbread
Serves 6 to 8
2 cups cornmeal, preferably stone ground (you may substitute up to half of the cornmeal with all purpose flour if you prefer)
1 teaspoon salt
1/2 teaspoon baking powder
1/2 teaspoon baking soda
4 tablespoons oil or drippings — bacon grease or lard gives distinctive flavor, but a mixture of a high heat vegetable oil, such as safflower or grape seed and butter, makes a fine substitute
1 large egg
1 1/2 cups whole buttermilk or whole milk
A few teaspoons of honey or sugar (optional)
Directions:
You really need a 9- to 10-inch cast-iron skillet for this recipe. If you do not have one, I can’t think of any better way to spend $15-20. You can buy cast iron pre-seasoned these days, if that part of the process has always scared you. You may substitute a 9- or 10-inch cake pan or muffin tins, but you will lose some crispness in the crust.
Heat the oven to 450 degrees. Heat the bacon grease or oil in a 9-inch cast-iron skillet in the oven for 10 minutes to get it very hot before you pour in the batter. Whisk the cornmeal, salt, baking soda, and baking powder together in a large bowl. Add the egg and buttermilk and whisk until smooth. Add the sweetener if you wish. With a thick oven mitt or kitchen towel, remove the hot skillet from the oven and very carefully swirl the grease around the pan to coat the sides. Pour about half of the hot oil into the batter and whisk it in. Then pour the batter into the hot skillet. If the batter does not sizzle when it hits the pan, it was not hot enough — heat it longer next time. Place the skillet on the lower oven rack and bake for 15 minutes. Transfer the skillet to the upper rack and continue baking until the cornbread is dark golden brown on top. Remove the skillet from the oven and invert the cornbread onto a large plate or cutting board. Slice into wedges and serve hot. If the cornbread will not be served immediately, it should be cooled on a rack so that the crust maintains its crispiness. The bread reheats in a moderate oven wonderfully.


